计算机
摘录
route add 172.160.1.0 mask 255.255.255.0 192.168.1.1 -p
----IP 、mask、 网关换成相应的 -p 表示永久
route delete 172.160.1.0 mask 255.255.255.0 192.168.1.1 -p
-- 删掉
首先要知道换网卡顺序是否可以进
打开网络共享中心,在左侧中间,点入后,按一下alt建,按高级,再按高级设置,在第一个页面调整顺序
若是换网卡顺序都不能进去,请百度或必应错误寻找解决办法
下面主要介绍换网卡就可以进去的方法
1、 可用网卡进去后
打开CMD,输入“ping+空格+域名”(域名为中间那个,如www.baidu.com,域名为baidu)
Ping完后会出现IP地址,以及TTL(跃点),记下来
2、 查看添加路由
在CMD中,输入“route print”可显示本机路由表,查看永久路由中是否两张网卡的网关都存在。(以内网和外网为例:两个都存在可能会存在冲突,这时候我们就要删除内网网关)
删除流程:先在注册表中将对应的的永久路由条目删掉
永久路由条目位置:
HKEY_LOCAL_MACHINE\SYSTEM\CurrentControlSet\Services\Tcpip\Parameters\PersistentRoutes
删除后,重起电脑,完毕后来,再使用route delete 0.0.0.0 mask 0.0.0.0 192.XXX.XX.XX(永久路由的网关)
添加永久路由:知道ip和跃点后,我们可以添加永久路由来解决域名没有解析的问题。输入: route add -p x.x.x.x mask x.x.x.x z.z.z.z metric 1
(外网IP)(子网掩码如255.255)(网卡网关永久路由表看到那个如10.0)
(metric 1 数字代表跃点数,上面有说如何查)
特别说明:添加路由后,登录此网站可能需要直接输入其ip地址,不能用域名登录
---------------------
作者:skHougeng
来源:CSDN
原文:https://blog.csdn.net/a2009a11a29/article/details/77880549
版权声明:本文为博主原创文章,转载请附上博文链接!
原创
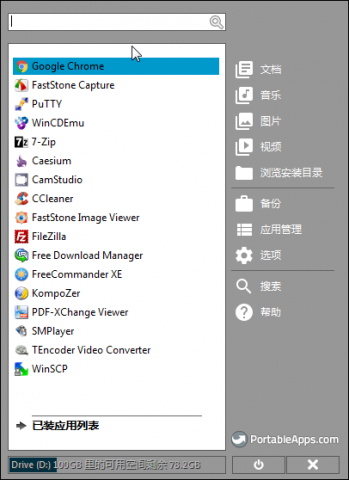
Portableapps 绿色版软件平台,个人很喜欢这种方式,直接拷到硬盘上就能使用 ,重装win系统后,也无需重新安装,也可以U盘上随身携带,
GoogleChromePortable---谷哥浏览器
Faststone Capture--截屏
Faststone Image Viewer--看图
Putty--
WinCDEmu--虚拟光驱
Caesium--图片压缩
CamStudio ---录屏
CCleaner--清理
Free Download Manager--下载
Free Commander XE ---双窗口文件管理
Kompozer--网页编写
PDF-Xchange Viewer---PDF阅读
SMPlayer--视频播放
Tencoder Video Converter--视频格式软换
Image

摘录
原文 https://blog.sunriseydy.top/technology/server-blog/server/zaiubuntushangyongaria2hearia2webuishixianyuanchengduoxianchengxiazai/
配置环境:Ubuntu16.04
1.基础软件的安装
在下载Aria2之前先安装一些基础必备的软件:git、screen、nodejs-legacy,在终端下输入命令:
sudo apt-get install git screen nodejs-legacy
如果有些软件已经安装过了就不用再安装
2.下载安装Aria2
下载安装Aria2一行命令就搞定:
sudo apt-get install aria2
3.下载Aria2WebUI
同样也是一行命令:
git clone https://github.com/ziahamza/webui-aria2.git
下载完之后会在当前目录下创建一个webui-aria2目录。
4.设置Aria2监听rpc,启动WebUI
screen -S aria2
新建一个名为aria2的会话
注意那个S是大写!S是大写!S是大写!
在新的会话中输入:
aria2c --enable-rpc --rpc-listen-all --rpc-secret asdfghjkl
注意:参数–rpc-secret 后面的字符串是自己自定义的token密码,要记住!要记住!要记住!
执行后会显示:
root@ubuntu:~# aria2c --enable-rpc --rpc-listen-all --rpc-secret asdfghjkl
[NOTICE] IPv4 RPC: listening on TCP port 6800
[NOTICE] IPv6 RPC: listening on TCP port 6800
记住port后面的端口号“6800”
然后依次按下键盘的ctrl、A、D 这三个键,回到前一个会话,输入
screen -S webui
新建一个名为webui的会话
在新的会话中,先跳转到上面说的webui-aria2目录中,再输入启动命令
root@ubuntu:~# ls aria2-1.32.0 lnmp-install.log webui-aria2 aria2-1.32.0.tar.bz2 pureftpd-install.log
root@ubuntu:~# cd webui-aria2
root@ubuntu:~/webui-aria2# ls
configuration.js Dockerfile fonts node-server.js css Dockerfile.arm index.html README.md directurl.md favicon.ico js screenshots docker-compose.yml flags LICENSE webui-aria2.spec
root@ubuntu:~/webui-aria2# node node-server.js
WebUI Aria2 Server is running on http://localhost:8888
出现WebUI Aria2 Server is running on http://localhost:8888说明WebUI已经启动成功,访问 http://YourIP:8888 即可进入Web界面
还是依次按下键盘的ctrl、A、D 这三个键,回到前一个会话,如果是用ssh客户端(如Putty)登陆的会话,这个时候就可以关闭这个会话了。
5.进入WebUI界面,通过rpc接口连接Aria2
如果你是在本地配置的,在浏览器地址栏输入127.0.0.1:8888/就能进入到WebUI界面,如果是在虚拟机里搭建的,先用ifconfig查看当前ip地址是什么
我显示的ip地址是192.168.106.129,就访问192.168.106.129:8888/ 就行了。
注意中间那个冒号是英文的冒号!是英文的冒号!是英文的冒号!
如果你是在有公网ip的vps上搭建的,访问“公网ip:8888/”就行了。
进入WebUI界面后可能会提示
糟糕! 连接到 Aria2 RPC 服务器时认证失败,将在10秒后重试。 您可能需要确认您的身份验证信息,请前往 设置 > 连接设置
这个时候在设置>连接设置里设置一下RPC服务
::__IHACKLOG_REMOTE_IMAGE_AUTODOWN_BLOCK__::1
主机后面填写Aria2服务所在的主机的ip,端口就是第四步中启动Aria2 监听RPC的端口6800,密码令牌就是参数–rpc-secret 后面的字符串,第四步中让你记住的那个。这三个填完点最下面的“保存连接配置”即可。只要配置填对了就能连接到Aria2了
到这你就可以通过顶部菜单中的“添加”来新建下载了。不过我还是建议你继续看下面的配置部分。
6.设置>全局设置
全局设置里提供了可视化的Aria2下载设置,都是英文的,这里的设置也就是aria2c -h 命令里的选项,有几个还是比较重要的。
continue 是否启用断点续传
如果启用断点续传,就选择true。
选中那个“快速访问”可以将这个选项在主页的右下角显示,一些常用的设置可以勾选。
——————————————————————————————————
dir 下载到哪个目录下
——————————————————————————————————
max-connection-per-server 每一个下载地址最多分几个连接
如果服务器配置好可以多填,简单来说就是设置多线程下载的线程数
——————————————————————————————————
max-download-limit 单个下载任务最大下载速度
这个就是限速用的,单位有“K”、“M”,它限制的是单个下载内容的速度
——————————————————————————————————
- max-upload-limit 每个下载的最大上传速度
这个是限制上传速度的,也是限制单个下载内容
——————————————————————————————————
max-concurrent 最大同时下载内容的个数
可以设定最多有几个同时下载的任务数
——————————————————————————————————
max-overall-download-limit, max-overall-dowbload-limit 总的最大下载和上传速度
限制总的下载速度和上传速度
——————————————————————————————————
摘录
Command-line installation composer
https://getcomposer.org/download/

php -r "copy('https://getcomposer.org/installer', 'composer-setup.php');"
php -r "if (hash_file('SHA384', 'composer-setup.php') === '544e09ee996cdf60ece3804abc52599c22b1f40f4323403c44d44fdfdd586475ca9813a858088ffbc1f233e9b180f061') { echo 'Installer verified'; } else { echo 'Installer corrupt'; unlink('composer-setup.php'); } echo PHP_EOL;"
php composer-setup.php
php -r "unlink('composer-setup.php');"
Globally Composer
mv composer.phar /usr/local/bin/composer
ubuntu18.04 apt-get install composer
更换源,
composer config -g repo.packagist composer https://packagist.phpcomposer.com
Download drupal
Option A: drupal-composer/drupal-project
- Run
composer create-project drupal-composer/drupal-project:8.x-dev my_site_name_dir --stability dev --no-interaction - This will download the 'drupal-composer/drupal-project' project into a folder named 'my_site_name_dir'
- It also automatically executes
composer installwhich will download Drupal 8 and all its dependencies.
You might want to modify some of the properties of the downloaded composer.json before running composer install. For example, it is possible that you want to rename the subdirectory 'web' to something else.
- Run
git clone https://github.com/drupal-composer/drupal-project.git my_site_name_dir - You can go to my_site_name_dir and edit the composer.json file.
- Run
composer install. This will download Drupal 8 and all its dependencies.
Follow the instructions for drupal-composer/drupal-project to learn more about it's configuration and features.
摘录
GRANT ALL PRIVILEGES ON *.* TO 'user'@'%' IDENTIFIED BY 'password' WITH GRANT OPTION;
1、连接Mysql
格式: mysql -h主机地址 -u用户名 -p用户密码
1、连接到本机上的MYSQL。
首先打开DOS窗口,然后进入目录mysql\bin,再键入命令mysql -u root -p,回车后提示你输密码.注意用户名前可以有空格也可以没有空格,但是密码前必须没有空格,否则让你重新输入密码。
如果刚安装好MYSQL,超级用户root是没有密码的,故直接回车即可进入到MYSQL中了,MYSQL的提示符是: mysql>
2、连接到远程主机上的MYSQL。假设远程主机的IP为:110.110.110.110,用户名为root,密码为abcd123。则键入以下命令:
mysql -h110.110.110.110 -u root -p 123;(注:u与root之间可以不用加空格,其它也一样)
3、退出MYSQL命令: exit (回车)
2、修改密码
格式:mysqladmin -u用户名 -p旧密码 password 新密码
1、给root加个密码ab12。
首先在DOS下进入目录mysql\bin,然后键入以下命令
mysqladmin -u root -password ab12
注:因为开始时root没有密码,所以-p旧密码一项就可以省略了。
2、再将root的密码改为djg345。
mysqladmin -u root -p ab12 password djg345
3、增加新用户
注意:和上面不同,下面的因为是MYSQL环境中的命令,所以后面都带一个分号作为命令结束符
格式:grant select on 数据库.* to 用户名@登录主机 identified by “密码”
1、增加一个用户test1密码为abc,让他可以在任何主机上登录,并对所有数据库有查询、插入、修改、删除的权限。首先用root用户连入MYSQL,然后键入以下命令:
grant select,insert,update,delete on *.* to [email=test1@”%]test1@”%[/email]” Identified by “abc”;
但增加的用户是十分危险的,你想如某个人知道test1的密码,那么他就可以在internet上的任何一台电脑上登录你的mysql数据库并对你的数据可以为所欲为了,解决办法见2。
2、增加一个用户test2密码为abc,让他只可以在localhost上登录,并可以对数据库mydb进行查询、插入、修改、删除的操作(localhost指本地主机,即MYSQL数据库所在的那台主机),这样用户即使用知道test2的密码,他也无法从internet上直接访问数据库,只能通过MYSQL主机上的web页来访问了。
grant select,insert,update,delete on mydb.* to [email=test2@localhost]test2@localhost[/email] identified by “abc”;
如果你不想test2有密码,可以再打一个命令将密码消掉。
grant select,insert,update,delete on mydb.* to [email=test2@localhost]test2@localhost[/email] identified by “”;
4.1 创建数据库
注意:创建数据库之前要先连接Mysql服务器
命令:create database <数据库名>
例1:建立一个名为xhkdb的数据库
mysql> create database xhkdb;
例2:创建数据库并分配用户
①CREATE DATABASE 数据库名;
②GRANT SELECT,INSERT,UPDATE,DELETE,CREATE,DROP,ALTER ON 数据库名.* TO 数据库名@localhost IDENTIFIED BY '密码';
③SET PASSWORD FOR '数据库名'@'localhost' = OLD_PASSWORD('密码');
依次执行3个命令完成数据库创建。注意:中文 “密码”和“数据库”是户自己需要设置的。
4.2 显示数据库
命令:show databases (注意:最后有个s)
mysql> show databases;
注意:为了不再显示的时候乱码,要修改数据库默认编码。以下以GBK编码页面为例进行说明:
1、修改MYSQL的配置文件:my.ini里面修改default-character-set=gbk
2、代码运行时修改:
①Java代码:jdbc:mysql://localhost:3306/test?useUnicode=true&characterEncoding=gbk
②PHP代码:header("Content-Type:text/html;charset=gb2312");
③C语言代码:int mysql_set_character_set( MYSQL * mysql, char * csname);
该函数用于为当前连接设置默认的字符集。字符串csname指定了1个有效的字符集名称。连接校对成为字符集的默认校对。该函数的工作方式与SET NAMES语句类似,但它还能设置mysql- > charset的值,从而影响了由mysql_real_escape_string() 设置的字符集。
4.3 删除数据库
命令:drop database <数据库名>
例如:删除名为 xhkdb的数据库
mysql> drop database xhkdb;
例子1:删除一个已经确定存在的数据库
mysql> drop database drop_database;
Query OK, 0 rows affected (0.00 sec)
例子2:删除一个不确定存在的数据库
mysql> drop database drop_database;
ERROR 1008 (HY000): Can't drop database 'drop_database'; database doesn't exist
//发生错误,不能删除'drop_database'数据库,该数据库不存在。
mysql> drop database if exists drop_database;
Query OK, 0 rows affected, 1 warning (0.00 sec)//产生一个警告说明此数据库不存在
mysql> create database drop_database;
Query OK, 1 row affected (0.00 sec)
mysql> drop database if exists drop_database;//if exists 判断数据库是否存在,不存在也不产生错误
Query OK, 0 rows affected (0.00 sec)
4.4 连接数据库
命令: use <数据库名>
例如:如果xhkdb数据库存在,尝试存取它:
mysql> use xhkdb;
屏幕提示:Database changed
use 语句可以通告MySQL把db_name数据库作为默认(当前)数据库使用,用于后续语句。该数据库保持为默认数据库,直到语段的结尾,或者直到发布一个不同的USE语句:
mysql> USE db1;
mysql> SELECT COUNT(*) FROM mytable; # selects from db1.mytable
mysql> USE db2;
mysql> SELECT COUNT(*) FROM mytable; # selects from db2.mytable
使用USE语句为一个特定的当前的数据库做标记,不会阻碍您访问其它数据库中的表。下面的例子可以从db1数据库访问作者表,并从db2数据库访问编辑表:
mysql> USE db1;
mysql> SELECT author_name,editor_name FROM author,db2.editor
-> WHERE author.editor_id = db2.editor.editor_id;
USE语句被设立出来,用于与Sybase相兼容。
有些网友问到,连接以后怎么退出。其实,不用退出来,use 数据库后,使用show databases就能查询所有数据库,如果想跳到其他数据库,用
use 其他数据库名字
就可以了。
4.5 当前选择的数据库
命令:mysql> select database();
MySQL中SELECT命令类似于其他编程语言里的print或者write,你可以用它来显示一个字符串、数字、数学表达式的结果等等。如何使用MySQL中SELECT命令的特殊功能?
1.显示MYSQL的版本
mysql> select version();
+-----------------------+
| version() |
+-----------------------+
| 6.0.4-alpha-community |
+-----------------------+
1 row in set (0.02 sec)
2. 显示当前时间
mysql> select now();
+---------------------+
| now() |
+---------------------+
| 2009-09-15 22:35:32 |
+---------------------+
1 row in set (0.04 sec)
3. 显示年月日
SELECT DAYOFMONTH(CURRENT_DATE);
+--------------------------+
| DAYOFMONTH(CURRENT_DATE) |
+--------------------------+
| 15 |
+--------------------------+
1 row in set (0.01 sec)
SELECT MONTH(CURRENT_DATE);
+---------------------+
| MONTH(CURRENT_DATE) |
+---------------------+
| 9 |
+---------------------+
1 row in set (0.00 sec)
SELECT YEAR(CURRENT_DATE);
+--------------------+
| YEAR(CURRENT_DATE) |
+--------------------+
| 2009 |
+--------------------+
1 row in set (0.00 sec)
4. 显示字符串
mysql> SELECT "welecome to my blog!";
+----------------------+
| welecome to my blog! |
+----------------------+
| welecome to my blog! |
+----------------------+
1 row in set (0.00 sec)
5. 当计算器用
select ((4 * 4) / 10 ) + 25;
+----------------------+
| ((4 * 4) / 10 ) + 25 |
+----------------------+
| 26.60 |
+----------------------+
1 row in set (0.00 sec)
6. 串接字符串
select CONCAT(f_name, " ", l_name)
AS Name
from employee_data
where title = 'Marketing Executive';
+---------------+
| Name |
+---------------+
| Monica Sehgal |
| Hal Simlai |
| Joseph Irvine |
+---------------+
3 rows in set (0.00 sec)
注意:这里用到CONCAT()函数,用来把字符串串接起来。另外,我们还用到以前学到的AS给结果列'CONCAT(f_name, " ", l_name)'起了个假名。
5.1 创建数据表
命令:create table <表名> ( <字段名1> <类型1> [,..<字段名n> <类型n>]);
例如,建立一个名为MyClass的表,
字段名 数字类型 数据宽度 是否为空 是否主键 自动增加 默认值
id int 4 否 primary key auto_increment
name char 20 否
sex int 4 否 0
degree double 16 是
mysql> create table MyClass(
> id int(4) not null primary key auto_increment,
> name char(20) not null,
> sex int(4) not null default '0',
> degree double(16,2));
5.3 删除数据表
命令:drop table <表名>
例如:删除表名为 MyClass 的表
mysql> drop table MyClass;
DROP TABLE用于取消一个或多个表。您必须有每个表的DROP权限。所有的表数据和表定义会被取消,所以使用本语句要小心!
注意:对于一个带分区的表,DROP TABLE会永久性地取消表定义,取消各分区,并取消储存在这些分区中的所有数据。DROP TABLE还会取消与被取消的表有关联的分区定义(.par)文件。
对与不存在的表,使用IF EXISTS用于防止错误发生。当使用IF EXISTS时,对于每个不存在的表,会生成一个NOTE。
RESTRICT和CASCADE可以使分区更容易。目前,RESTRICT和CASCADE不起作用。
5.4 表插入数据
命令:insert into <表名> [( <字段名1>[,..<字段名n > ])] values ( 值1 )[, ( 值n )]
例如:往表 MyClass中插入二条记录, 这二条记录表示:编号为1的名为Tom的成绩为96.45, 编号为2 的名为Joan 的成绩为82.99, 编号为3 的名为Wang 的成绩为96.5。
mysql> insert into MyClass values(1,'Tom',96.45),(2,'Joan',82.99), (2,'Wang', 96.59);
注意:insert into每次只能向表中插入一条记录。
5.5 查询表中的数据
1)、查询所有行
命令: select <字段1,字段2,...> from < 表名 > where < 表达式 >
例如:查看表 MyClass 中所有数据
mysql> select * from MyClass;
2)、查询前几行数据
例如:查看表 MyClass 中前2行数据
mysql> select * from MyClass order by id limit 0,2;
select一般配合where使用,以查询更精确更复杂的数据。
5.6 删除表中数据
命令:delete from 表名 where 表达式
例如:删除表 MyClass中编号为1 的记录
mysql> delete from MyClass where id=1;
下面是一个删除数据前后表的对比。
FirstName LastName Age
Peter Griffin 35
Glenn Quagmire 33
下面以PHP代码为例删除 "Persons" 表中所有 LastName='Griffin' 的记录:
<?php
$con = mysql_connect("localhost","peter","abc123");
if (!$con)
{
die('Could not connect: ' . mysql_error());
}
mysql_select_db("my_db", $con);
mysql_query("DELETE FROM Persons WHERE LastName='Griffin'"); mysql_close($con);
?>
在这次删除之后,表是这样的:
FirstName LastName Age
Glenn Quagmire 33
5.7 修改表中数据
语法:update 表名 set 字段=新值,… where 条件
mysql> update MyClass set name='Mary' where id=1;
例子1:单表的MySQL UPDATE语句:
UPDATE [LOW_PRIORITY] [IGNORE] tbl_name SET col_name1=expr1 [, col_name2=expr2 ...] [WHERE where_definition] [ORDER BY ...] [LIMIT row_count]
例子2:多表的UPDATE语句:
UPDATE [LOW_PRIORITY] [IGNORE] table_references SET col_name1=expr1 [, col_name2=expr2 ...] [WHERE where_definition]
UPDATE语法可以用新值更新原有表行中的各列。SET子句指示要修改哪些列和要给予哪些值。WHERE子句指定应更新哪些行。如果没有WHERE子句,则更新所有的行。如果指定了ORDER BY子句,则按照被指定的顺序对行进行更新。LIMIT子句用于给定一个限值,限制可以被更新的行的数目。
5.8 增加字段
命令:alter table 表名 add字段 类型 其他;
例如:在表MyClass中添加了一个字段passtest,类型为int(4),默认值为0
mysql> alter table MyClass add passtest int(4) default '0'
加索引
mysql> alter table 表名 add index 索引名 (字段名1[,字段名2 …]);
例子: mysql> alter table employee add index emp_name (name);
加主关键字的索引
mysql> alter table 表名 add primary key (字段名);
例子: mysql> alter table employee add primary key(id);
加唯一限制条件的索引
mysql> alter table 表名 add unique 索引名 (字段名);
例子: mysql> alter table employee add unique emp_name2(cardnumber);
删除某个索引
mysql> alter table 表名 drop index 索引名;
例子: mysql>alter table employee drop index emp_name;
增加字段:
mysql> ALTER TABLE table_name ADD field_name field_type;
修改原字段名称及类型:
mysql> ALTER TABLE table_name CHANGE old_field_name new_field_name field_type;
删除字段:
MySQL ALTER TABLE table_name DROP field_name;
5.9 修改表名
命令:rename table 原表名 to 新表名;
例如:在表MyClass名字更改为YouClass
mysql> rename table MyClass to YouClass;
当你执行 RENAME 时,你不能有任何锁定的表或活动的事务。你同样也必须有对原初表的 ALTER 和 DROP 权限,以及对新表的 CREATE 和 INSERT 权限。
如果在多表更名中,MySQL 遭遇到任何错误,它将对所有被更名的表进行倒退更名,将每件事物退回到最初状态。
RENAME TABLE 在 MySQL 3.23.23 中被加入。
6、备份数据库
命令在DOS的[url=file://\\mysql\\bin]\\mysql\\bin[/url]目录下执行
1.导出整个数据库
导出文件默认是存在mysql\bin目录下
mysqldump -u 用户名 -p 数据库名 > 导出的文件名
mysqldump -u user_name -p123456 database_name > outfile_name.sql
2.导出一个表
mysqldump -u 用户名 -p 数据库名 表名> 导出的文件名
mysqldump -u user_name -p database_name table_name > outfile_name.sql
3.导出一个数据库结构
mysqldump -u user_name -p -d –add-drop-table database_name > outfile_name.sql
-d 没有数据 –add-drop-table 在每个create语句之前增加一个drop table
4.带语言参数导出
mysqldump -uroot -p –default-character-set=latin1 –set-charset=gbk –skip-opt database_name > outfile_name.sql
例如,将aaa库备份到文件back_aaa中:
[root@test1 root]# cd /home/data/mysql
[root@test1 mysql]# mysqldump -u root -p --opt aaa > back_aaa
7.1 一个建库和建表的实例1
drop database if exists school; //如果存在SCHOOL则删除
create database school; //建立库SCHOOL
use school; //打开库SCHOOL
create table teacher //建立表TEACHER
(
id int(3) auto_increment not null primary key,
name char(10) not null,
address varchar(50) default ‘深圳’,
year date
); //建表结束
//以下为插入字段
insert into teacher values(”,’allen’,'大连一中’,'1976-10-10′);
insert into teacher values(”,’jack’,'大连二中’,'1975-12-23′);
如果你在mysql提示符键入上面的命令也可以,但不方便调试。
1、你可以将以上命令原样写入一个文本文件中,假设为school.sql,然后复制到c:\\下,并在DOS状态进入目录[url=file://\\mysql\\bin]\\mysql\\bin[/url],然后键入以下命令:
mysql -uroot -p密码 < c:\\school.sql
如果成功,空出一行无任何显示;如有错误,会有提示。(以上命令已经调试,你只要将//的注释去掉即可使用)。
2、或者进入命令行后使用 mysql> source c:\\school.sql; 也可以将school.sql文件导入数据库中。
7.2 一个建库和建表的实例2
drop database if exists school; //如果存在SCHOOL则删除
create database school; //建立库SCHOOL
use school; //打开库SCHOOL
create table teacher //建立表TEACHER
(
id int(3) auto_increment not null primary key,
name char(10) not null,
address varchar(50) default ''深圳'',
year date
); //建表结束
//以下为插入字段
insert into teacher values('''',''glchengang'',''深圳一中'',''1976-10-10'');
insert into teacher values('''',''jack'',''深圳一中'',''1975-12-23'');
注:在建表中
1、将ID设为长度为3的数字字段:int(3);并让它每个记录自动加一:auto_increment;并不能为空:not null;而且让他成为主字段primary key。
2、将NAME设为长度为10的字符字段
3、将ADDRESS设为长度50的字符字段,而且缺省值为深圳。
4、将YEAR设为日期字段。
http://see.xidian.edu.cn/cpp/u/mysql_ml/
摘录
Multisite Drupal
Download the latest Drupal Code base.
Then, upload and extract all the files into a new folder for Drupal. For example: /public_html/drupal/
Next step
In this example i'll be creating two websites
test1.localhost.com
and
test2.localhost.com
I Will be needing two database for two sites
test1_db
test2_db
Next step is to inform drupal about our need for multisite.
So we need to add the sites.php file.
You can find extra examples and documentation of how to set it up in the example.sites.php file.
Copy the file and rename it to sites.php
add the following lines to configure the above sites
$sites['test1.localhost.com'] = 'test1.localhost.com';
$sites['test2.localhost.com'] = 'test2.localhost.com';
Next step will be:
In /drupal/sites create the following folders
test1.localhost.com
test2.localhost.com
After above configurations (copy sites/default/example.settings.php into sites/subsite/settings.php and edit it) you need to install both the site using url below and then after installation you can access your multi site feature.
test1.localhost.com/core/install.php
test2.localhost.com/core/install.php
You can find more info on multisite in core/INSTALL.txt.
摘录
Introduction
In this tutorial, we'll show you how to configure vsftpd to allow a user to upload files to his or her home directory using FTP with login credentials secured by SSL/TLS.
Prerequisites
To follow along with this tutorial you will need:
- An Ubuntu 16.04 server with a non-root user with sudo privileges:
Once you have an Ubuntu server in place, you're ready to begin.
Step 1 — Installing vsftpd
We'll start by updating our package list and installing the vsftpd daemon:
- sudo apt-get update
- sudo apt-get install vsftpd
When the installation is complete, we'll copy the configuration file so we can start with a blank configuration, saving the original as a backup.
- sudo cp /etc/vsftpd.conf /etc/vsftpd.conf.orig
With a backup of the configuration in place, we're ready to configure the firewall.
Step 2 — Opening the Firewall
We'll check the firewall status to see if it’s enabled. If so, we’ll ensure that FTP traffic is permitted so you won’t run into firewall rules blocking you when it comes time to test.
- sudo ufw status
In this case, only SSH is allowed through:
Output
Status: active
To Action From
-- ------ ----
OpenSSH ALLOW Anywhere
OpenSSH (v6) ALLOW Anywhere (v6)
You may have other rules in place or no firewall rules at all. Since only ssh traffic is permitted in this case, we’ll need to add rules for FTP traffic.
We'll need to open ports 20 and 21 for FTP, port 990 for later when we enable TLS, and ports 40000-50000 for the range of passive ports we plan to set in the configuration file:
- sudo ufw allow 20/tcp
- sudo ufw allow 21/tcp
- sudo ufw allow 990/tcp
- sudo ufw allow 40000:50000/tcp
- sudo ufw status
Now our firewall rules looks like:
Output
Status: active
To Action From
-- ------ ----
OpenSSH ALLOW Anywhere
990/tcp ALLOW Anywhere
20/tcp ALLOW Anywhere
21/tcp ALLOW Anywhere
40000:50000/tcp ALLOW Anywhere
OpenSSH (v6) ALLOW Anywhere (v6)
20/tcp (v6) ALLOW Anywhere (v6)
21/tcp (v6) ALLOW Anywhere (v6)
990/tcp (v6) ALLOW Anywhere (v6)
40000:50000/tcp (v6) ALLOW Anywhere (v6)
With vsftpd installed and the necessary ports open, we're ready to proceed to the next step.
Step 3 — Preparing the User Directory
For this tutorial, we're going to create a user, but you may already have a user in need of FTP access. We'll take care to preserve an existing user’s access to their data in the instructions that follow. Even so, we recommend you start with a new user until you've configured and tested your setup.
First, we’ll add a test user:
- sudo adduser sammy
Assign a password when prompted and feel free to press "ENTER" through the other prompts.
FTP is generally more secure when users are restricted to a specific directory.vsftpd accomplishes this with chroot jails. When chroot is enabled for local users, they are restricted to their home directory by default. However, because of the way vsftpd secures the directory, it must not be writable by the user. This is fine for a new user who should only connect via FTP, but an existing user may need to write to their home folder if they also shell access.
In this example, rather than removing write privileges from the home directory, we're will create an ftpdirectory to serve as the chroot and a writable files directory to hold the actual files.
Create the ftp folder, set its ownership, and be sure to remove write permissions with the following commands:
- sudo mkdir /home/sammy/ftp
- sudo chown nobody:nogroup /home/sammy/ftp
- sudo chmod a-w /home/sammy/ftp
Let's verify the permissions:
- sudo ls -la /home/sammy/ftp
Output
total 8
4 dr-xr-xr-x 2 nobody nogroup 4096 Aug 24 21:29 .
4 drwxr-xr-x 3 sammy sammy 4096 Aug 24 21:29 ..
Next, we'll create the directory where files can be uploaded and assign ownership to the user:
- sudo mkdir /home/sammy/ftp/files
- sudo chown sammy:sammy /home/sammy/ftp/files
A permissions check on the files directory should return the following:
- sudo ls -la /home/sammy/ftp
Output
total 12
dr-xr-xr-x 3 nobody nogroup 4096 Aug 26 14:01 .
drwxr-xr-x 3 sammy sammy 4096 Aug 26 13:59 ..
drwxr-xr-x 2 sammy sammy 4096 Aug 26 14:01 files
Finally, we'll add a test.txt file to use when we test later on:
- echo "vsftpd test file" | sudo tee /home/sammy/ftp/files/test.txt
Now that we've secured the ftp directory and allowed the user access to the files directory, we'll turn our attention to configuration.
Step 4 — Configuring FTP Access
We're planning to allow a single user with a local shell account to connect with FTP. The two key settings for this are already set in vsftpd.conf. Start by opening the config file to verify that the settings in your configuration match those below:
- sudo nano /etc/vsftpd.conf
/etc/vsftpd.conf
. . .
# Allow anonymous FTP? (Disabled by default).
anonymous_enable=NO
#
# Uncomment this to allow local users to log in.
local_enable=YES
. . .
Next we'll need to change some values in the file. In order to allow the user to upload files, we’ll uncomment the write_enable setting so that we have:
/etc/vsftpd.conf
. . .
write_enable=YES
. . .
We’ll also uncomment the chroot to prevent the FTP-connected user from accessing any files or commands outside the directory tree.
/etc/vsftpd.conf
. . .
chroot_local_user=YES
. . .
We’ll add a user_sub_token in order to insert the username in our local_root directory path so our configuration will work for this user and any future users that might be added.
/etc/vsftpd.conf
user_sub_token=$USER
local_root=/home/$USER/ftp
We'll limit the range of ports that can be used for passive FTP to make sure enough connections are available:
/etc/vsftpd.conf
pasv_min_port=40000
pasv_max_port=50000
Note: We pre-opened the ports that we set here for the passive port range. If you change the values, be sure to update your firewall settings.
We will also add a directive telling vsftpd to listen on a particular port for incoming FTP connections:
/etc/vsftpd.conf
listen_port=45000
Since we’re only planning to allow FTP access on a case-by-case basis, we’ll set up the configuration so that access is given to a user only when they are explicitly added to a list rather than by default:
/etc/vsftpd.conf
userlist_enable=YES
userlist_file=/etc/vsftpd.userlist
userlist_deny=NO
userlist_deny toggles the logic. When it is set to "YES", users on the list are denied FTP access. When it is set to "NO", only users on the list are allowed access. When you're done making the change, save and exit the file.
Finally, we’ll create and add our user to the file. We'll use the -a flag to append to file:
- echo "sammy" | sudo tee -a /etc/vsftpd.userlist
Double-check that it was added as you expected:
cat /etc/vsftpd.userlist
Output
sammy
Restart the daemon to load the configuration changes:
- sudo systemctl restart vsftpd
Now we're ready for testing.
Step 5 — Testing FTP Access
We've configured the server to allow only the user sammy to connect via FTP. Let's make sure that's the case.
Anonymous users should fail to connect: We disabled anonymous access. Here we'll test that by trying to connect anonymously. If we've done it properly, anonymous users should be denied permission:
- ftp -p 203.0.113.0
Output
Connected to 203.0.113.0.
220 (vsFTPd 3.0.3)
Name (203.0.113.0:default): anonymous
530 Permission denied.
ftp: Login failed.
ftp>
Close the connection:
- bye
Users other than sammy should fail to connect: Next, we'll try connecting as our sudo user. They, too, should be denied access, and it should happen before they're allowed to enter their password.
- ftp -p 203.0.113.0
Output
Connected to 203.0.113.0.
220 (vsFTPd 3.0.3)
Name (203.0.113.0:default): sudo_user
530 Permission denied.
ftp: Login failed.
ftp>
Close the connection:
- bye
sammy should be able to connect, as well as read and write files: Here, we'll make sure that our designated user canconnect:
- ftp -p 203.0.113.0
Output
Connected to 203.0.113.0.
220 (vsFTPd 3.0.3)
Name (203.0.113.0:default): sammy
331 Please specify the password.
Password: your_user's_password
230 Login successful.
Remote system type is UNIX.
Using binary mode to transfer files.
ftp>
We'll change into the files directory, then use the get command to transfer the test file we created earlier to our local machine:
- cd files
- get test.txt
Output
227 Entering Passive Mode (203,0,113,0,169,12).
150 Opening BINARY mode data connection for test.txt (16 bytes).
226 Transfer complete.
16 bytes received in 0.0101 seconds (1588 bytes/s)
ftp>
We'll turn right back around and try to upload the file with a new name to test write permissions:
- put test.txt upload.txt
Output
227 Entering Passive Mode (203,0,113,0,164,71).
150 Ok to send data.
226 Transfer complete.
16 bytes sent in 0.000894 seconds (17897 bytes/s)
Close the connection:
- bye
Now that we've tested our configuration, we'll take steps to further secure our server.
Step 6 — Securing Transactions
Since FTP does not encrypt any data in transit, including user credentials, we'll enable TTL/SSL to provide that encryption. The first step is to create the SSL certificates for use with vsftpd.
We'll use openssl to create a new certificate and use the -days flag to make it valid for one year. In the same command, we'll add a private 2048-bit RSA key. Then by setting both the -keyout and -out flags to the same value, the private key and the certificate will be located in the same file.
We'll do this with the following command:
- sudo openssl req -x509 -nodes -days 365 -newkey rsa:2048 -keyout /etc/ssl/private/vsftpd.pem -out /etc/ssl/private/vsftpd.pem
You'll be prompted to provide address information for your certificate. Substitute your own information for the questions below:
Output
Generating a 2048 bit RSA private key
............................................................................+++
...........+++
writing new private key to '/etc/ssl/private/vsftpd.pem'
-----
You are about to be asked to enter information that will be incorporated
into your certificate request.
What you are about to enter is what is called a Distinguished Name or a DN.
There are quite a few fields but you can leave some blank
For some fields there will be a default value,
If you enter '.', the field will be left blank.
-----
Country Name (2 letter code) [AU]:US
State or Province Name (full name) [Some-State]:NY
Locality Name (eg, city) []:New York City
Organization Name (eg, company) [Internet Widgits Pty Ltd]:DigitalOcean
Organizational Unit Name (eg, section) []:
Common Name (e.g. server FQDN or YOUR name) []: your_IP_address
Email Address []:
For more detailed information about the certificate flags, see OpenSSL Essentials: Working with SSL Certificates, Private Keys and CSRs
Once you've created the certificates, open the vsftpd configuration file again:
- sudo nano /etc/vsftpd.conf
Toward the bottom of the file, you should two lines that begin with rsa_. Comment them out so they look like:
/etc/vsftpd.conf
# rsa_cert_file=/etc/ssl/certs/ssl-cert-snakeoil.pem
# rsa_private_key_file=/etc/ssl/private/ssl-cert-snakeoil.key
Below them, add the following lines which point to the certificate and private key we just created:
/etc/vsftpd.conf
rsa_cert_file=/etc/ssl/private/vsftpd.pem
rsa_private_key_file=/etc/ssl/private/vsftpd.pem
After that, we will force the use of SSL, which will prevent clients that can't deal with TLS from connecting. This is necessary in order to ensure all traffic is encrypted but may force your FTP user to change clients. Change ssl_enable to YES:
/etc/vsftpd.conf
ssl_enable=YES
After that, add the following lines to explicitly deny anonymous connections over SSL and to require SSL for both data transfer and logins:
/etc/vsftpd.conf
allow_anon_ssl=NO
force_local_data_ssl=YES
force_local_logins_ssl=YES
After this we'll configure the server to use TLS, the preferred successor to SSL by adding the following lines:
/etc/vsftpd.conf
ssl_tlsv1=YES
ssl_sslv2=NO
ssl_sslv3=NO
Finally, we will add two more options. First, we will not require SSL reuse because it can break many FTP clients. We will require "high" encryption cipher suites, which currently means key lengths equal to or greater than 128 bits:
/etc/vsftpd.conf
require_ssl_reuse=NO
ssl_ciphers=HIGH
When you're done, save and close the file.
Now, we need to restart the server for the changes to take effect:
- sudo systemctl restart vsftpd
At this point, we will no longer be able to connect with an insecure command-line client. If we tried, we'd see something like:
- ftp -p 203.0.113.0
- Connected to 203.0.113.0.
- 220 (vsFTPd 3.0.3)
- Name (203.0.113.0:default): sammy
- 530 Non-anonymous sessions must use encryption.
- ftp: Login failed.
- 421 Service not available, remote server has closed connection
- ftp>
摘录
#/etc/security/limits.conf
* soft nofile 51200
* hard nofile 51200
ulimit -n 51200
#/etc/sysctl.conf
fs.file-max = 51200
net.core.rmem_max = 67108864
net.core.wmem_max = 67108864
net.core.netdev_max_backlog = 250000
net.core.somaxconn = 4096
net.ipv4.tcp_syncookies = 1
net.ipv4.tcp_tw_reuse = 1
net.ipv4.tcp_tw_recycle = 0
net.ipv4.tcp_fin_timeout = 30
net.ipv4.tcp_keepalive_time = 1200
net.ipv4.ip_local_port_range = 10000 65000
net.ipv4.tcp_max_syn_backlog = 8192
net.ipv4.tcp_max_tw_buckets = 5000
net.ipv4.tcp_fastopen = 3
net.ipv4.tcp_mem = 25600 51200 102400
net.ipv4.tcp_rmem = 4096 87380 67108864
net.ipv4.tcp_wmem = 4096 65536 67108864
net.ipv4.tcp_mtu_probing = 1
net.ipv4.tcp_congestion_control = hybla
sysctl -p